Spruce Chanter Reed (demo)

A forum about Uilleann (Irish) pipes and the surly people who play them.
User avatar
DMQuinn
Posts: 166
Joined: Wed Dec 18, 2002 6:00 pm
Please enter the next number in sequence: 1
Location: Scenic and historic Waterloo, NY.

Re: Spruce Chanter Reed (demo)

Post by DMQuinn »

Mike Hulme wrote:I am about to make a few of these, but am going to cheat! I will use some close grained Italian spruce, originally intended for viola bellies, but will cut off the thickest section, turn it round on the Boxford, then bore and ream it out to the size of cane I use, then treat it as a cane tube.
...
This would only yield two slips of the correct orientation, and a lot of good wood would end up on the floor.

If you like, the "correct" orientation is such that the ray cells are prominently visible on the slip. I think it makes more sense to work up a block of wood as long as the desired slip, a little thicker than the desired width of the slip, and then cleave it to establish the plane of the grain. You can then round one edge of the block such that it approximates the outside curvature of the slip you want, or would expect to be working with on an analogous cane slip, and then slice it off with a saw. This leaves you with a slip to work with much as you would work a cane slip, and a block ready to prepare the next slip from. I also work from spruce sold as viola bellies, and this approach will give you a lot more slips to play with than the business of trying to work up a cane-like tube.
Mike Hulme
Posts: 497
Joined: Thu Jul 24, 2003 6:26 pm
antispam: No
Please enter the next number in sequence: 10
Location: United Kingdom
Contact:

Re: Spruce Chanter Reed (demo)

Post by Mike Hulme »

Thanks, David!

I was actually wondering what to do with the remainder of the belly, so I'll use the thin edge of the wedge first as you describe.

Mike
User avatar
DMQuinn
Posts: 166
Joined: Wed Dec 18, 2002 6:00 pm
Please enter the next number in sequence: 1
Location: Scenic and historic Waterloo, NY.

Re: Spruce Chanter Reed (demo)

Post by DMQuinn »

Mike Hulme wrote:Thanks, David!

I was actually wondering what to do with the remainder of the belly, so I'll use the thin edge of the wedge first as you describe.

Mike
Well, I’m not sure how many slips you’ll be able to get from the thin edge of the belly blank, but there’s probably one in there, at least.

After I posted that note yesterday I began wondering about the various ways it could be misconstrued. The whole purpose of making the blocks I described yesterday is to maximize the number of slips you can get from a given piece of wood. Orientation of the grain structure is pretty important, though, and unless you plan carefully the block of wood you cut from the board so that it represents a stack of slips all with the correct grain orientation, it’s a waste of time.

Belly blanks are typically arranged so that the grain structure of the finished viola top is the same as it would be in a reed, so if the blank came from a reputable dealer used to selling to serious luthiers, you’re half-way home. I have also bought larger chunks of spruce, and when getting out wood to make reeds from, you really have to saw carefully to make sure the grain lines up correctly. In such a case the step of cleaving the wood becomes necessary, so that you can identify the lengthwise “flow” of the grain. As has already been pointed out earlier in this thread, if the grain structure is not truly parallel with the sense of the slip, a gouge may follow the grain in one direction, cutting too deeply too quickly.

Probably like everybody else who takes a whack at making wooden reeds, I came to it with all the baggage of having made cane reeds for years. Only a part of the technology of making cane reeds can be usefully applied to making wooden reeds. It’s tempting to want to handle the wood the same way you’d handle cane, but it’s not necessarily the best way to do things.
Mike Hulme
Posts: 497
Joined: Thu Jul 24, 2003 6:26 pm
antispam: No
Please enter the next number in sequence: 10
Location: United Kingdom
Contact:

Re: Spruce Chanter Reed (demo)

Post by Mike Hulme »

I meant to say thinner edge of the belly; the last half inch wouldn't be good enough. I got the majority of my stock of spruce from my old teacher in Yugoslavia, and he was obsessive about the grain orientation, for precisely the reasons you mention. As I think about it more, turning a tube on the lathe would destroy the exposed grain, and would mean a lot of scraping to correct. So I think I will make a smallish scraper plane with a form tool of the correct cutting diameter and see how that goes with a squared "slip" mounted in a jig.

Mike
User avatar
DMQuinn
Posts: 166
Joined: Wed Dec 18, 2002 6:00 pm
Please enter the next number in sequence: 1
Location: Scenic and historic Waterloo, NY.

Re: Spruce Chanter Reed (demo)

Post by DMQuinn »

Mike Hulme wrote:I meant to say thinner edge of the belly; the last half inch wouldn't be good enough. I got the majority of my stock of spruce from my old teacher in Yugoslavia, and he was obsessive about the grain orientation, for precisely the reasons you mention. As I think about it more, turning a tube on the lathe would destroy the exposed grain, and would mean a lot of scraping to correct. So I think I will make a smallish scraper plane with a form tool of the correct cutting diameter and see how that goes with a squared "slip" mounted in a jig.

Mike
I'm pretty sure what you are describing will work, but I get pretty decent results just establishing the outside curvature on a disk sander, freehand. I knock the corners off with a plane, and then take it to the sander.
User avatar
Lorenzo
Posts: 5726
Joined: Fri May 24, 2002 6:00 pm
Please enter the next number in sequence: 1
Location: Oregon, USA

Re: Spruce Chanter Reed (demo)

Post by Lorenzo »

DMQuinn wrote:Belly blanks are typically arranged so that the grain structure of the finished viola top is the same as it would be in a reed...
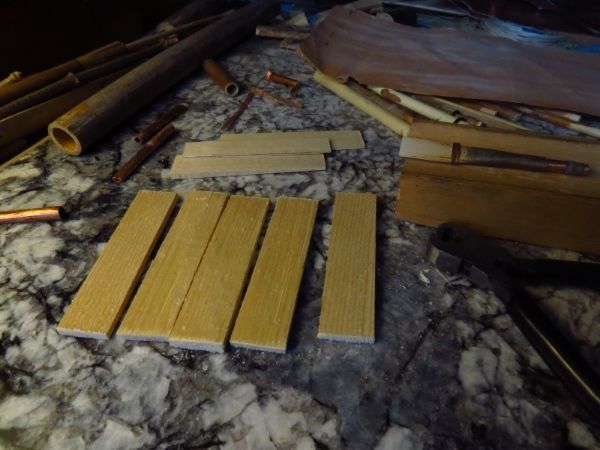
I hadn't considered using viola or violin tops as a good source of spruce. Thanks for the suggestion. I wonder what the best spacing is for growth rings on a slip...I think 8/per 11mm was mentioned previously.

I've been cutting/splitting rectangular slips that are 1/8" thick, sanding the bottom (concave) side first on a pipe, then shaping the top by hand with a knife before finishing with sandpaper, then cutting the V per usual. Sounds like the right sander works good and saves some labor. I doubt my reeds sound anywhere as good as they should, so will keep experimenting. Must find some good (damaged) viola tops... :)
Image
donpiper
Posts: 88
Joined: Fri Mar 19, 2010 6:24 am
antispam: No

Re: Spruce Chanter Reed (demo)

Post by donpiper »

I have not finished one yet, but I have sanded a few slips down to size.

I have been cutting two blade length pieces (~60mm long) from a double thickness (6-7mm) piece
using a japanese pull saw (kerf 0.8mm), across the growth rings. gives pieces 2.5 - 3.0mm thick.
gives me the best chance of balancing the blades.
donpiper
Posts: 88
Joined: Fri Mar 19, 2010 6:24 am
antispam: No

Re: Spruce Chanter Reed (demo)

Post by donpiper »

Thanks Larry for the update on your spruce reeds, it is encouraging to hear
about your success, especially the comparison with cane reeds.
I wonder what the best spacing is for growth rings on a slip...

With the spruce I used (came from packing crates - some looks a lot like
the stuff in Lorenzo's pic, some has a slight pinkish or brownish tinge
and the growth rings are not as even - some wider some narrower)

I found that earlywood (the pale softer stuff between the darker rings)
much wider than 1mm tended to flex very easily as it got thinner at the edges
of the slip.

With pressure it produced a recurved shape gap at the lips
(like Mick Jagger's lips, rather than a cat's eye shape).

The first few slips I cut with the closer spaced rings at the centreline of
the slip. These produced this effect very easily.

The next few I cut with the widest spaced rings along the centreline, the
narrower along the edges. These were not so bad.

I was initially dismayed by this as I thought these reeds would have an
unstable back d; the usual result of weak corners on a reed.

I looked at those slips again today, all are stiffer than when I cut & sanded them
about 6 months ago, and much more evenly so. I can only imagine they have
dried out somewhat, even though the wood was under cover for years before
I cut them.

I am more confident that I might get a working reed from them than
I was yesterday.

I would recommend with spruce using pieces with a ring spacing
of around 1.25mm or less with as even ring spacing as possible.

Leaving them some time to settle before final sanding and tieing
might help. Though I can't help wondering if the extra flexibility of a
freshly cut piece would help in avoiding splitting when I tie the slips
to the staple.


The spruce I used sanded noticeably quicker than cane.
I cut adjacent pieces ~60mm long ~3mm thick, then trimmed them with a
block plane with a SHARP carbon steel blade to an even thickness of 2.5-2.7mm.
I then glued the pieces together with a drop of superglue on the
centreline near each end so the growth rings matched.

I then trimmed them to width (0.5-1mm oversize) along the grain with a
sharp hobby knife, then cleaned up the edges with the block plane.

I then sanded the outside curve on each side in a concave sanding block
(I used 25mm ID for narrow bore, 28mm ID for concert pitch).
I checked for thickness with a digital caliper, eyeballed for eveness.

I then split the two pieces at the glue joint with the hobby knife,
and sanded the inside curve in each piece on a sanding cylinder.
Again I checked for thickness with a digital caliper, eyeballed for eveness.
The lips ends need more care using this method, not to taper too much near
the inside of the lips.

This is as far as I have got to date.

I will raise the grain using the method I described above,
cut the tails as usual, raise the grain again, final sand, then tie.

After that will come the real tricky stuff.
Roger O'Keeffe
Posts: 2233
Joined: Wed Feb 20, 2002 6:00 pm
antispam: No
Please enter the next number in sequence: 10
Location: Back home in the Green and Musty Isle, in Dublin.

Re: Spruce Chanter Reed (demo)

Post by Roger O'Keeffe »

an seanduine wrote:Oboe plaque :https://www.google.com/search?q=oboe+pl ... B355%3B355

Bob
Best used in conjunction with dental floss. :lol:
An Pluiméir Ceolmhar
User avatar
Lorenzo
Posts: 5726
Joined: Fri May 24, 2002 6:00 pm
Please enter the next number in sequence: 1
Location: Oregon, USA

Re: Spruce Chanter Reed (demo)

Post by Lorenzo »

Great to hear your of progress and to read your description, donpiper. I've gotten sidetracked, so no video of the new reed yet. Keep up the good work!
Post Reply