
http://cgi.ebay.com/ws/eBayISAPI.dll?Vi ... 20341&rd=1
Don't know anything about the maker. Who's selling?
Halfset on Ebay
Re: Halfset on Ebay
PJ wrote:http://cgi.ebay.com/ws/eBayISAPI.dll?Vi ... 20341&rd=1
Don't know anything about the maker. Who's selling?
PJ,
I don't know if Casey is still turning but here's an article still around that I've found years ago. It happened to be still around so I scanned it.
I don't know much about this maker or if he's still around somewhere.
Check it out:
Making Bagpipes by Casey Burns
(Please note - permission to reprint this article in local
Piping journals, etc. can be requested to me directly at
cburns@kendaco.telebyte. com)
Introduction
Bagpipe making and general wind instrument turning has been
evolving for several hundreds of years and continues to evolve
to this day. This essay presents an outline of my method of
making bagpipes, as well as a few reflections on other methods.
This craft generally requires lathe work - experience at the
lathe helps but is not entirely necessary! I enjoyed my first
experiences at a lathe turning with my first instrument. I
later humbly found out that my turning skills left alot to be
desired after spending a precious month with a master wood
turner who was learning wind instrument making from me.
Therefore, I highly recommend that the novice bagpipe maker
contact the American Association of Woodturners and make their
acquaintance! Their local chapters conduct workshops and
meetings where excellent information on woodturning may be
obtained, as well as direct contact with some of the living
masters of woodturning. The AAW may be contacted at c/o Mary
Redig 667 Harriet Ave. Shoreview MN 55126. I will begin by
describing the materials and tooling needed, followed by a
discussion on dimensions and drawings. Then I will delve into
actual construction, beginning with the bore, followed by
outside turning. Then I will describe how I drill tone holes.
Final setup and tuning and voicing will finish the construction
part. Finally, I discuss some general aspects of wind
instrument making.
Tooling
The most important item for a wind instrument shop is a
suitably equipped lathe - commonly though not exclusively a
high speed metal lathe, with at least 18" or so between the
centers. I use an old Atlas 6" lathe which I have modified
slightly. Several makers prefer the Myford Super 7. The lathe
should have tapered roller bearings in the headstock, as
opposed to sleeve bearings, for the higher speed capacity.
I have stripped this lathe of the screw cutting assembly, which
until recently I kept handy for when I needed the slow feed for
turning metal (I now have a nice old Sheldon 11 x 44 with quick
change gears and much greater accuracy for metal turning).
Various common accessories like chucks and different kinds of
centers are useful. One of the most useful items is a 1/2 Morse
2 collet and drawbar. The tailstock I equipped with a large
diameter revolving center. It is also important that the
spindle apparatus of the tailstock be removeable - for this
setup.
I have fitted this lathe also with a number of common wood
turning type tool rests - 2 of which mount on the compound
slide rest and are therefore easily positionable. A number of
turning scrapers of different sizes and shapes live on the
bench next to the lathe. These are mostly made from old files,
tool bits and even concrete nails and dental tools! The only
actual authentic turning tool is a small spindle gouge.
By removing the drive spindle apparatus, I can slide the slide
rest off the lathe and set it up exclusively for hand turning.
To mount on the slide rest, I have made a number of tool blocks
of aluminum that require a 1/2 wrench to quick change. One of
these carries a boring bar, another a cutoff bit, and finally
one that carries a conventional lathe bit ground into a "gouge"
tool.
The lathe must be equipped with an appropriate steady rest, a 3
jaw chuck, as well as some carriage stop fixture. On my lathe I
use a bar of steel and a vise grip with softened jaws.
Other tools that are used in my shop include various D bit
drills made from drill rod, hollow gun drills (made by
Eldorado), compressed air, common drill bits of various sizes,
and finally a Milling Machine - which is used primarily as a
precision drill press, as well as a high speed buffer (probably
not the most appropriate use!). Other tools that come in very
handy include a Foredom handpiece tool and various cutters, as
well as the common tools that are found in a home workshop.
My workshop is my own personal 20 year amalgamation of tools
that I have acquired, collected, absorbed, etc. Minimal
requirements for bagpipe making require some sort of lathe and
drill press.
Reamers and Drills
There has been much written on this subject in various
journals. Essentially, bores of wind instruments are rarely
straight tapered - instead there are several acoustically
significant bumps and grinds. Therefore, custom reamers need to
be made. However, Northumbrian pipes and Scottish Smallpipes
are mostly cylindrically bored - therefore - these do not need
reamers, mostly. The Scottish smallpipe tapers below the last
vent hole - a hardware store reamer works well for this.
My best bagpipe reamers have been carefully ground from
prehardened tool steel. Jointer blade steel works very well for
this, because of its hardness and tensile strength. I grind
these wet, to keep the steel from burning. The reamers have a
"D" cross section, and cut well at medium speed.
Larger reamers (such as for flutes) are turned to shape. Then a
1/4 section is removed from them by milling. The resulting edge
is ground and then burnished.
Common twist drills may be used to drill bores, but are likely
to twist. I use them to start the bore - but most of the
drilling is done with the gun drill, which is held in the
tailstock in place of the tailstock spindle. Compressed air
blows through the drill, and blows chips out the long flute.
These drills are very impressive, and feature carbide tips.
They are also rather expensive. Drill rod, on the other hand,
is quite cheap. D bits may be made from these - I swedge the
ends a little wider before grinding the cutting end to shape so
that they have relief.
To make a D bit, 1/2 of the diameter of the drill is cut away,
leaving a surface for chips to collect. The cutting end is then
shaped to an angle - with the outside contacting edge being the
leading edge. The end is then hardened and tempered.
Materials
Any medium to dense turning wood is suitable for bagpipe making
as long as it is not porous, or likely to warp and check.
Traditional woods include the ebonies, rosewoods including
Blackwood, boxwood and fruitwoods.
Other useful materials include sandpaper in 120, 220, 320 and
600 for finishing. Raw linseed oil and super glue are used for
a finish. Finally, various materials such as bone, artificial
ivory or horn are turned for mounts.
Dimensions and Drawings
The best source of information on dimensions of bagpipes are
the instruments themselves - especially if they are working.
Antique instruments in museums and collections may sometimes be
studied - usually, these will have previously been measured and
most museums are willing to make copies, sometimes for a small
fee. A problem with museum specimens is knowing whether or not
they played well - and at what pitch. Another problem is access
- most museums are not willing to let unskilled hands handle
their treasures!
Published drawings of instruments are sometimes available -
although commonly disappointing and barely adequate. However,
with experience the maker can overcome these shortcomings and
find this information useful. The Northumbrian Pipes book by
Cocks and Bryan is a noticeable exception. The pipes in this
book are very well drawn and carefully detailed.
I am hoping next year to render several drawings of pipes I
have measured available in book format, along with an expanded
and illustrated version of this text.
First Steps
The wood for the pipes must be cut into turning squares
approximately 35 by 35 mm or more as needed - and trimmed to
slightly more than their finished lengths. Each square is then
carefully machined into a true cylinder. Again - a metal lathe
with cross slide mounted tools facilitates this. The
cylindricalness will be useful shortly for using a steady rest.
Alternatively, the wood can be turned in the conventional
fashion, using a skew or a spindle gouge. A flutemaker I know
does this - and then uses a 1-3/8" bearing glued to a block of
wood as a steady, which is clamped to the ways. The end of the
turning blank is trimmed to fit this bearing using a 1-3/8" box
wrench, with the "lower" edge cut into a nice chisel (it
automatically trims the wood to diameter!).
I prefer to use a cup center in the headstock as opposed to
spur centers for 2 reasons. One is that I can relocate the wood
on the center if necessary. The other reason is that if the
wood catches and stops revolving, nothing will happen - no
flying splinters, etc. This added degree of safety makes the
process more enjoyable.
Boring Out
Now the spindles are ready to receive pilot bores. The 3 jaw
chuck is attached to the headstock and the steady rest is
clamped to the ways. A spindle is mounted in the chuck and the
outboard end is supported by the steady rest. On my lathe, the
steady rest has 3 brass pins which center the work. I lubricate
the contact with beeswax, applied while revolving. I sometimes
turn off a little bit of wood to each side of the contact point
- especially in harder woods such as Blackwood, to keep the
points from heating and charring the wood. I have seen newer
steadies with revolving points that do not require this.
I have also seen a home built lathe built to accomodate the
diameter of the work - so that the work may be clamped on the
end - rather than use a 3 jaw and steady. The headstock is made
from aluminum, with large truck bearings supporting a spindle
made from 2" pipe. A pipe flange supports a carefully mounted 3
jaw chuck. The steady rest becomes unnecessary. I hope to build
myself one of these lathes after I build my new workshop!
The spindle is removed from the tailstock, and a hollow
gundrill is clamped in its place. I have a 5/32" gun drill for
piloting my bagpipe bores. A small pilot hole is drilled for a
few mm. I drill this undersize and true it if necessary - or
the drill will wander too far off sometimes! Then as the work
revolves, the drill is applied, with compressed air supplied
from the rear to blow out the chips. The drill has to be
frequently withdrawn to clean the chips. Beeswax is the
preferred lubricant. ALternatively, a D bit made from drill rod
may be used - but this will be much slower for obvious reasons!
There will be some wander. After boring out the spindles, I
center the spindles again by mounting them between centers -
this time using the bore for my centerpoints and having the pin
in the cup center extended just a little. The outside is turned
concentric with the bore. One excellent feature of gun drills
is that although they may wander, the bores themselves have
very little runout. This is also true for D bits.
I use the expensive gun drill to pilot the bore. I then use
less expensive D bits and even long twist drills to drill out
the bores to finish diameter. Sometimes the work is held in the
hand, and the drill held in a headstock chuck, or I use the
previous method.
Sockets are also drilled - I prefer to drill them out undersize
while the recentered workpiece is revolving and is supported by
the steady rest. I then ream them out with a carefully sized
straight machinists reamer of appropriate diameter. Stocks are
bored using a larger D bit - usually a 3/4" or 7/8" for French
bagpipes.
Multiple drone stocks such as for a smallpipe are drilled using
a drill press (I use my milling machine). This block is
sometimes turned before drilling.
Boring a Conical Chanter
For chanters, I will step bore the wood to an approximation of
the internal taper, in steps of 1/16" to 1/8". I cut just a
little shy of the target depth/diameter. Once the bore has been
stepped, I then prepare to ream. The reamers are mounted in the
headstock chuck and revolve at medium speed. The chanter blank
is held by the hands, and applied to the reamer with just
enough force to cut without binding. As the reaming process is
underway, I stop from time to time to measure the bore, using
an inside measuring gauge at several points - so that I obtain
the correct diameters.
I usually use a suite of reamers to develop a specific bore
profile. Of course, one reamer correctly dimensioned will work
- but I prefer to experiment. An additional factor is that the
reamer, no matter how carefully made, may not cut exactly to
the preferred diameter at all points. In fact, this is rarely
the case for these narrow bores. Using several reamers in
combination will overcome this.
Before turning the outside....
Once everything is bored, I sometimes machine the ends of the
spindles so that they are true and square, if I don't plan to
do this as part of the outside turning. At this point, I
sometimes find flaws in the wood - those pieces are discarded.
I like to soak the pieces in linseed oil at this point as well.
This is also the time to apply mounts, if they are to be used
on these pipes - with the exception of metal chased mounts,
which are added later. The mount is rounded, and then bored and
turned to its final ID, using a boring bar (the work is held in
the 3 jaw). The stock to receive the mount is centered between
cup or a conical center (if the diameter is large enough) and
live center, and a corresponding shoulder is turned for the
mount - I use a modified cutoff tool for this operation. The
mount is then glued to the spindle using epoxy. Note that it is
best to do this BEFORE soaking the joint in linseed oil.
Outside Turning
The joints are then allowed to drain for a few days or weeks if
possible. Then they are turned between centers to their
finished profiles. I usually rough the profiles with the gouge
tool on the cross slide. Then hand tools are used to finish the
profiles. Tenons are turned to dimension using a modified
cutoff tool so that they are cylindrical.
I support the work at the headstock in a variety of fashions.
The cup center works well for narrow bores. Otherwise, if there
is a socket - or for conical bored chanters, I support the work
with the wider end near the headstock with a conical center. On
my lathe I use a center held in the headstock spindle with a
collet and drawbar.
Once the shape is roughed out, I use a wide scraper to fair the
curves. I use smaller profiled scrapers and point tools to cut
ornamental beads. Mounts are turned similarly and become part
of the profile. The process of turning the outside is best
learned by experience! It is no different than chair spindle
turning.
"Combing" is applied with a point tool, or with a small
triangular file.
Finally, I sand the profiles until I have sanded with all
grades of sand paper. I then apply a finish. This can be a
simple paste wax and oil. However, I use a Linseed oil and
superglue finish applied in this manner:
DO THIS WITH ADEQUATE VENTILATION!!! I fold a couple of paper
towels into a small pad. I put about a tablespoon of raw
linseed oil on the towel. Then a few drops of super glue are
applied - right to the oil. This is then applied to the
revolving wood and rubbed on. I will add a number of coats,
buffing in between.
Once, Jim McGill and I were turning a chanter out of a very
fine grained ebony called African Black Ivory. We applied
several coats, buffing well in between. Eventually, the chanter
achieved a very high gloss. We then realized that only in very
strong light could you determine that it was wood. It looked
like we had turned it into ABS plastic instead!
Drilling Fingerholes
The fingerholes are carefully laid out on the chanter. I then
mount the chanter between special blocks with centers which are
mounted on the table of the milling machine. The finger holes
are drilled in line - using the travel of the milling table to
position. Each hole is drilled a few 10ths of a mm undersize -
or more if I am uncertain of my dimensions. The thumb hole is
drilled after carefully rotating the chanter so that the
fingerholes are pointing straight down. A mirror helps this.
Alternatively, the wood could be drilled by holding it in a
simple V block (made with a tablesaw) and sliding the v block
on the drill press table. In any case, I lightly hone the
leading edge of the drill bits to a neutral angle - so that the
bits don't catastrophically pull through the wood leaving
splinters behind!
Setup, Tuning and Voicing
I make a bag, tie on the stocks using artificial sinew
(available from Tandy Leather), attach a valve to the blowpipe
and thread everything up. See my comments elsewhere in the
Bagpipe newsgroup for more information on that. Reeds are
fitted to the drones and tuned. Finally, a good chanter reed is
made - tested on a similar instrument if one is available.
The chanter is tuned note by note. Each hole, starting at the
bottom, is carefully reamed out until the note is slightly flat
to the final pitch. I go all the way up, blowing out chips as I
go. Finally, the final tuning is accomplished by careful and
judicious undercutting of each hole. The undercutting is done
using a little cylindrical cutter mounted in a handpiece
(Foredom). The bottom holes are never undercut - since this
affects those notes poorly. Knowing exactly how much to cut
with reaming and undercutting is a skill that is learned by
practice! Wax and tape are used remedially...
Finally, the outsides are again oiled - the entire instrument
is cleaned inside and out of chips, and then the outside is
buffed. At this point, the instrument is more or less done.
However, I sometimes keep my pipes around longer, to play them
for a few weeks and play them in. I discover a few minor
problems here and there, and correct them. Also, a new chanter
reed is supplied - as the tuning process sometimes ruins the
reed (from sawdust mostly).
The Tradition of Wind Instrument Making
Most people think of wind instruments in terms of the
relatively mundane instruments of the orchestra. In reality,
woodwinds are found in almost every culture, and require a
classification resembling that of the natural kingdom.
Geographically, wind instruments are as widely ranging as the
lathe, the primary tool required to make them. Historically,
wind instrument making and the lathe are closely woven
together. For the turner, investigation of this fascinating
technology rewards one with new ideas that are sprung from the
old. Woodwinds are classified according to the acoustical
mechanism by which they sound. Broadly speaking, there are the
flutes, which include many historical and ethnic precursors to
the one we are familiar with, including the recorder, the Irish
whistle and even certain organ pipes. Then there are the single
reeds - these include the clarinet and its precursors, plus
many bizarre ethnic forms of this instrument that defy exact
classification. The oboe and bassoon are members of the double
reed family, which also includes many shawms of different
cultures, various Renaissance instruments such as the krumhorn
and rackett, and many others.
Finally there are the bagpipes, which use both single and
double reeds, but are unusual by their method of aspiration.
When people think of bagpipes they think of Scotland, where
this woodwind arrived relatively late. There are over 250
species of bagpipe known. The scope of this tradition can be
put in somewhat better perspective by considering the number of
turners involved. A catalog of European makers, all turners,
lists approximately 5000 from the Renaissance to the present
who bothered to sign their work; this is just the tip of the
iceberg. Here exists a technology directly relevant to the
turner that has its roots in antiquity, has achieved a full and
varied expression, and continues to evolve to this day. Similar
to many forms of artistic expression, the evolution of wind
instrument turning followed cultural explorations. We find
evidence of early single reed types of instruments in Egyptian
tombs which are now found throughout the Mediterranean. Oboe
type instruments evolved in China and headed west along trade
routes.
Along with these instruments was the technology to make them -
i.e., the lathe! As cultures emerged, their instruments
developed into distinct forms defined by local traditions and
practices. Finally, the artistic excesses of the European
Renaissance and Baroque created a situation where instrument
makers could barely keep up with a rapidly evolving and
changing artistic expression.
Unfortunately, in the last 150 years, such demands were put on
the maker for acoustical perfection that the technology which
created beautiful and delicately turned ivory flutes, boxwood
oboes with engine turned mounts, etc. was left behind so that
now we think of wind instruments in simplified, mass produced
terms. We almost lost the underlying current of ethnic wind
instrument making, which continued to evolve at its leisurely
pace until the two world wars almost completely obliterated it.
In the last 20 years, there has been a new renaissance which
has rediscovered what was almost lost to us. Although many of
the practices were lost, their results are not difficult to
uncover in the hundreds of collections that are known to exist.
In the isolated places where the tradition remained unbroken,
fascinating clues to the past may be found, if one looks hard
enough. In northern Africa one can find instrument makers
turning with a bow lathe, sitting on the ground and using their
feet as the tool rest. A friend of mine recently met some
Scottish bagpipe makers in Pakistan (where, actually, many of
the pipes used in American pipe bands come from) who were using
western lathes bolted to the floor and were surrounded by
mountains of turning squares, completed bagpipe parts, turning
debris and, of course, the ever present hooka (also turned, by
the way!) which the turner found a need to frequently use!
Today most wind instrument turners approach their art sideways
- usually they studied some instrument such as the flute since
childhood through college, and then chose to become a maker of
historical varieties - reproducing the past. Or they have an
interest in some ethnic music, and find that they must provide
the tools to be able to create this music. Most are self
taught. There is a preoccupation with what the instruments
should exactly sound like. The sound of the instrument depends
upon the shape created by the bore - that is, the wood on the
inside that has been carefully removed. Some makers are myopic
because of this preoccupation and regard the turning aspect of
this craft as a somewhat painful necessity and refer to it
disparagingly as "furniture making"! However, a wind instrument
maker who can use a skew chisel carefully is hard to find!
Until a few years ago, I had yet to discover the joys of the
spindle gouge! In the past, a strong integration existed
between turning and wind instrument making. Because the craft
is undergoing rediscovery by musicians who become turners out
of necessity, isolation from the rest of the turning world has
created conditions for the evolution of techniques specific to
this craft. Fortunately, as with "regular turning" (alas, my
bias as a wind instrument turner reveals itself!), there are
personalities and innovaters who have approached this craft
scientifically and are more or less responsible for "guiding
the masses" as it were.
The surface treatment of wind instruments varies greatly,
following historical examples. In the classical music arena,
some of the best examples of turning date from the French and
English Baroque and are widely copied - finely executed rings,
graceful shapes and ornaments of ivory, sometimes ornamentally
turned, are to be found. Researches of the last 15 years have
uncovered a rich turning tradition in the many varieties of
European bagpipes, especially those of the French, which are
also traced to the Baroque along certain lines. In these
bagpipes, one may find the use of several different kinds of
woods and polychromatic inlays of pewter, horn, bone and ivory.
There are certain claims from the past as to the woods used for
turning and their preparation. Boxwood was cut into squares,
turned, pilot bored, waxed and left buried in manure for twenty
years before it would hold up to the rigors of repeated wetting
and drying of playing. Instead of sawing wood on a bandsaw,
blanks were cleaved out of the log to insure against any
defects or irregularities - although at great cost! Today, the
woods most commonly employed include boxwood, ebony, blackwood
and other rosewoods, fruitwoods, olive, cocus and maple,
providing it is hard enough. Almost any hard and fine grained
turning wood is suitable provided it has some stability. One
technique for improving the stability of some woods such as
boxwood is to microwave the partially bored and turned blank
(endgrain is sealed!) followed by soaking and a prolonged
period of drying - this process is akin to sizing fabric.
The elegant look of ivory is hard to resist for some makers -
which is a dilemma many of us have to consider. Because ivory
that is not seasoned for many years is too unstable to use,
especially for complete instruments, antique ivory is most
commonly used. Unfortunately, this competes with the other
demands for ivory which is contributing to the demise of the
elephant, and so alternatives have been sought. Ordinary beef
bone, cut from femurs and knuckles turns very well and is
convincing - although it lacks the slightly creamy color of
ivory. To process this bone, it is best to contact a local
butcher, freeze the bone (and attached meat!), bandsaw it to
length, then boil it for a few hours in several changes of
baking soda water until it is free of meat and grease, then
bleach it in the sun for several weeks. In the past, when I
have used Ivory, it has usually been fossil ivory from Alaska.
For me the process of turning bone or ivory is unhealthy, even
with a good dust mask and dust collection equipment. I have
turned enough of it to feel a heaviness in the lungs so that I
no longer, along with ethical reasons, use it. Instead, I have
found a completely nontoxic "alternative ivory" made of
polyester resin that is manufactured in England. This material
is a joy to turn, unlike every other plastic alternative I have
tried, such as Corion. It drills well, is capable of fine
detail, and has the color and feel of ivory. I also don'’t have
to conserve every single chip of it. This material is
affordable, and is available.
Finally, once the "furniture making" is completed, the musical
skills of the wind instrument maker are put to the test, tuning
and voicing the instrument. In addition to the skills of the
machinist and woodworker, the woodwind maker must be able to
cope with reedmaking, which is a highly specialized art in
itself, and he must also be an accomplished performer on the
instrument he or she is creating - or at least have a strong
idea of what it should sound like. Usually making and playing
develop hand in hand, especially with unusual varieties of
woodwinds. I have found this to be the case with French
bagpipes, which, along with flutes, are another specialty. Once
the instrument is sounding perfectly, the processes of resawing
the wood, making reamers and turning the pieces seems to fade
in significance! Making the music is the primary joy of wind
instrument making!
Casey Burns 9962 Shorty Campbell Road
Kingston WA 98346 (360) 297-4020
cburns@kendaco.telebyte. com
homepage URL is http://kendaco.telebyte.com/cburns
-
Patrick D'Arcy

- Posts: 3188
- Joined: Sun Aug 19, 2001 6:00 pm
- antispam: No
- Please enter the next number in sequence: 12
- Location: Los Angeles (via Dublin, Ireland)
- Contact:
To quote (sort of) the immortal words of Yosser Hughes - "Get a job!" 
Here's Casey's current website link:
http://www.caseyburnsflutes.com/
Patrick.
Here's Casey's current website link:
http://www.caseyburnsflutes.com/
Patrick.
Piper Sunday: socalpipers.com/piper_sunday.html
Pipes: UilleannObsession.com
Music: PatrickDarcyMusic.com
YouTube: My Channel - Click & Subscribe!
Southern California Pipers Club: socalpipers.com
Web Design: DarcyCreative.com
Pipes: UilleannObsession.com
Music: PatrickDarcyMusic.com
YouTube: My Channel - Click & Subscribe!
Southern California Pipers Club: socalpipers.com
Web Design: DarcyCreative.com
-
Greg Schnider
- Posts: 63
- Joined: Tue Jan 07, 2003 6:00 pm
- Please enter the next number in sequence: 1
- Location: Langley, BC, Canada
- Contact:
This is one of the very few (if not only) sets of uilleann pipes that Casey made.
They have bounced around to quite a few different owners in Victoria, and even spent some time sitting in a pawn shop. At one point, before I got my current Moore set, I was considering pruchasing them.
They were eventually rescued and refurbished a few years ago and ended up sounding quite nice.
It looks like they are off on their wandering ways again.
Greg
-
djm

- Posts: 17853
- Joined: Sat May 31, 2003 5:47 am
- Please enter the next number in sequence: 1
- Location: Canadia
- Contact:
Greg, is Casey and Finnegan there just for Casey Burns' sake? 
I have a Casey Burns flute in mopane that is very well made. I wasn't aware that he had dabbled in UPs. I don't know if the high quality of his flutes is any measure of his pipemaking abilities.
djm
I have a Casey Burns flute in mopane that is very well made. I wasn't aware that he had dabbled in UPs. I don't know if the high quality of his flutes is any measure of his pipemaking abilities.
djm
I'd rather be atop the foothills than beneath them.
-
rorybbellows

- Posts: 3195
- Joined: Sun Dec 14, 2003 7:50 am
- antispam: No
- Please enter the next number in sequence: 10
- Location: the cutting edge
-
Greg Schnider
- Posts: 63
- Joined: Tue Jan 07, 2003 6:00 pm
- Please enter the next number in sequence: 1
- Location: Langley, BC, Canada
- Contact:
Everyone else was changing their avatars, so I decided to follow suite. I watched Mr. Dressup every day when I was a kid.djm wrote:Greg, is Casey and Finnegan there just for Casey Burns' sake?
I have a Casey Burns flute in mopane that is very well made. I wasn't aware that he had dabbled in UPs. I don't know if the high quality of his flutes is any measure of his pipemaking abilities.
djm
The Burns set was made 15 or more years ago. I do know that at least one hole in the chanter was moved by Casey during the manufacturing process.
1/2 set on eBay
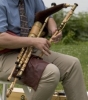
To end all speculation, I am the seller of the half set on eBay.
I got these from Eric Reiswig of BC UPS, who was extremely helpful with me during the whole Purchase / Shipping / Setup process.
Although it is true that this set did spend some time in a pawn shop, and that indeed the back "D" hole was moved by Casey himself during construction, Eric, being a budding and quite promising new maker in his own right, and close liaison with Rob Moore, went through this set thoroughly before he sold it to me, and I'm sure would vouch for their lovely performance. Indeed, Eric stated that he preferred the sound of the drones on this set to his own.
I'm selling 1) because I've been laid off, times are tough & everything must go (break my heart) and 2) because there is no compensating for lack of talent. My only wish is that this set goes to someone who will utilize them to the fullest.
I don't know why if you click on "Seller's Other Items" the auction posting comes up a second time (with the same posting #!), but it most certainly isn't a scam. As the site states, I have a bunch of other photos for those who would like to request them.
Steve Jones
Toronto, Ontario
-
eric reiswig

- Posts: 46
- Joined: Wed Oct 30, 2002 6:00 pm
- Please enter the next number in sequence: 1
- Location: Victoria, Canada
- Contact:
Hi all,
It's all true. I had rescued them from a local pawn shop some years ago, and finally put them up for sale in December 2003. Steve bought them, and i'm sorry to hear now that he's having to give them up.
I had some correspondence with Casey Burns when i was buying & refurbishing the set; he said that he'd made "a number of" practice & half sets over the years, and that this set was one of his last, made about 1988-89. (He's been making pipes for years, mostly SSP and French pipes, but is of course better known as a flute maker.)
When i last had them, they were going well, and yes, these are some of my favourite drones ever. I'm not normally a drone tone geek, but some sets just kind of speak to you, and these definitely do it for me.
Steve, good luck with the sale. I hope they find another good home.
Be seeing you.
Re: 1/2 set on eBay
gryffyth wrote:
To end all speculation, I am the seller of the half set on eBay.
I got these from Eric Reiswig of BC UPS, who was extremely helpful with me during the whole Purchase / Shipping / Setup process.
Although it is true that this set did spend some time in a pawn shop, and that indeed the back "D" hole was moved by Casey himself during construction, Eric, being a budding and quite promising new maker in his own right, and close liaison with Rob Moore, went through this set thoroughly before he sold it to me, and I'm sure would vouch for their lovely performance. Indeed, Eric stated that he preferred the sound of the drones on this set to his own.
I'm selling 1) because I've been laid off, times are tough & everything must go (break my heart) and 2) because there is no compensating for lack of talent. My only wish is that this set goes to someone who will utilize them to the fullest.
I don't know why if you click on "Seller's Other Items" the auction posting comes up a second time (with the same posting #!), but it most certainly isn't a scam. As the site states, I have a bunch of other photos for those who would like to request them.
Steve Jones
Toronto, Ontario
Gryfyth,
Could you PM me to discuss this particular set? I would like to know more, as I am looking for another set of pipes.
upiper71
Eric: You don't know me but I play with a fellow Montrealer here Brendan and Bernie W. he says hello and so do I...